Creating An Aarch64 Urbit OS DockerImage

I recently began migrating all my services (Prometheus, Grafana, Collabora, Home Assistant, Nextcloud, Redis, Node-red and PiHole) off of dedicated Raspberry Pis/make shift server devices to my 4 Node Raspberry Pi 4 K3s cluster. It took a mad amount of time, reading, tinkering, and troubleshooting but I was able to successfully get the pods running. Now the only thing remaining was my Urbit OS. I thought I could go online and easily find an Urbit OS docker image for ARM64 architecture but I was completely wrong.
If you don't know what Urbit is, you can get a general run down here:
 Shahraiz
The only docker images I was able to come across were for AMD64 architecture. Which led me to two choices, either I wait until someone creates one and keep using a dedicated Raspberry Pi for Urbit OS or I make an Aarch64 docker image of Urbit OS myself. Clearly I ended up going for the later because I really want to use my Raspberry Pi for another project and at the moment there is no where to purchase a Raspberry Pi or any single board computer for that matter!
Research
I curently host my primary planet on a Raspberry Pi 4, so I know its possible and I'm not entering an unachievable territory based on my minimal knowledge. So I began by looking for an Urbit installation instructions for ARM64 devices and came across this gem :
It details clearly how to get Urbit up and running on devices capable of running in AArch64 (aka 64-bit) mode such as the Raspberry Pi 3 & 4. Honestly, this was like 99% of the work, because without it I would not be able to make this docker image.
Then to understand how a docker image works I decided to go back and look at the ARM64 Urbit OS docker images. Sometimes I work better with reverse engineering compared to reading documentation from step one. If you click each letter in 'ARM64', you will see all the images that I used for reference. Upon inspecting the Dockerfile from paulbellamy/docker-urbit I noticed that the Dockerfile consisted of steps.
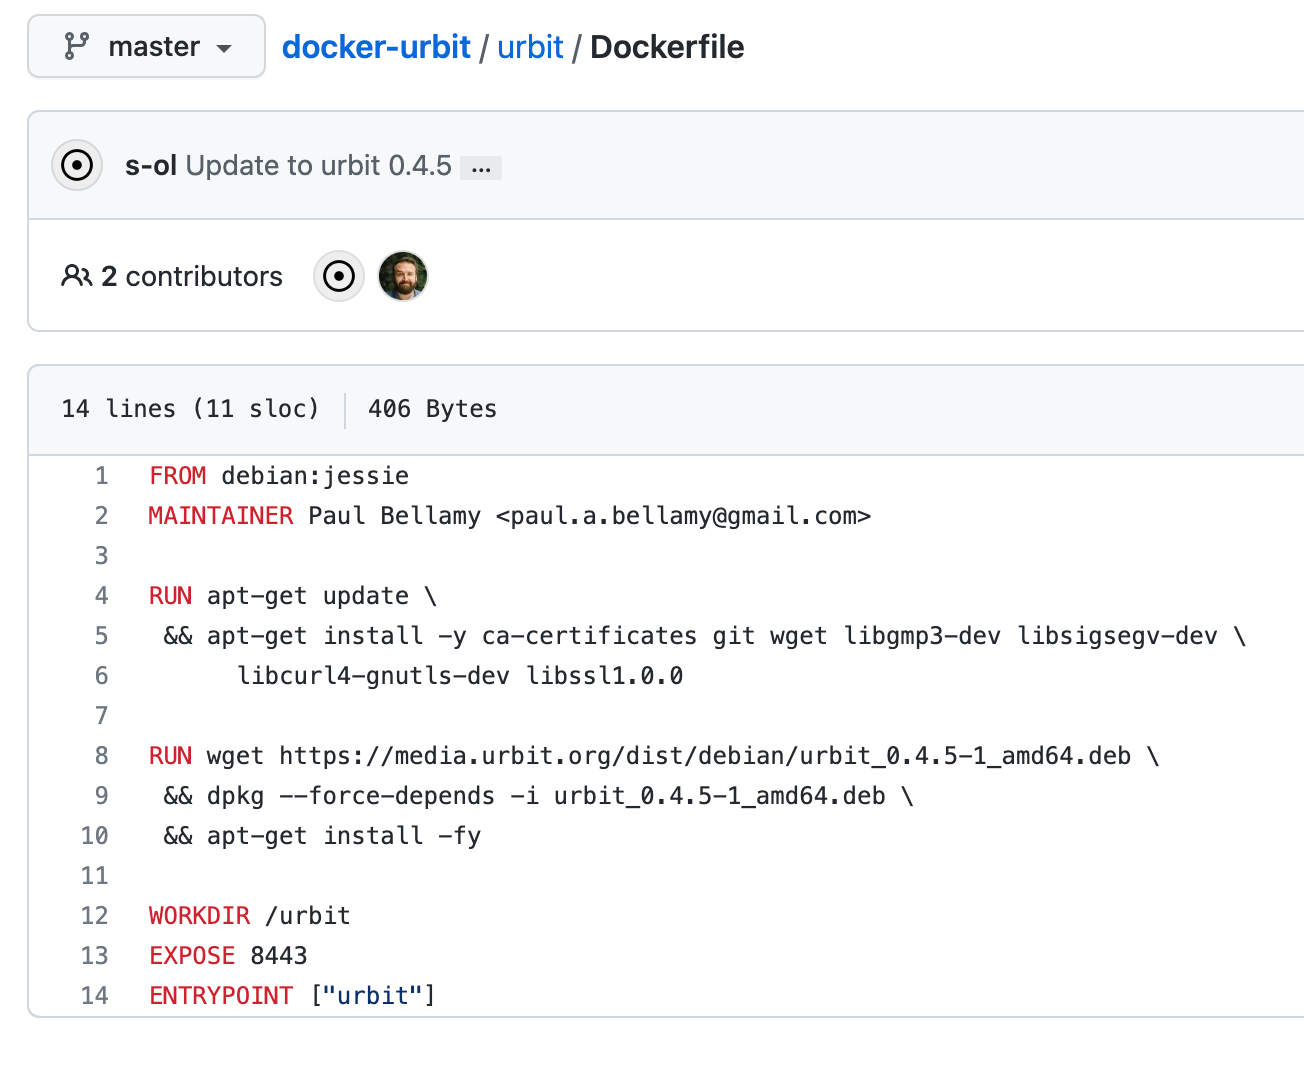
A step containing the base image that will be used, another step running a command, and another step creating a directory. Its beginning to make sense! I just needed to take the instructions I found on ~dasfeb/smol-computer's website and translate them into steps within a Dockerfile.
Create Dockerfile
Before we begin, the following is assumed:
- You have Docker daemon installed
- You have Docker CLI installed
- You have an account on DockerHub
I'll be using Terminal on a MacBook Pro with Docker Daemon and CLI installed.
Launch Terminal, create a directory, go into directory, and create a file named 'Dockerfile'.
mkdir urbit-docker
cd urbit-docker
vim Dockerfile In the Docker file we need a base image, and I really don't have the knowledge to understand which one to pick so I went with one that was used in a recent release, Urbit OS app on Umbrel. In the Dockerfile code for that, I noticed they used FROM arm64v8/python:3.9-slim-buster as ship-runner and I just felt it made sense to use it as well.
Next, I decided to add our blog's information as a maintainer MAINTAINER Interesting Soup [email protected]
Then, we needed to update the base image and install some dependencies that I obviously was made aware of after running the Dockerfile multiple times and receiving an error every time I was missing a dependancy. I took note and added it back to my Dockerfile. RUN apt-get update && apt-get --no-install-recommends install -y curl wget gnupg
Now we need to take the installation steps from ~dasfeb/smol-computer's website and translate them to a Dockerfile. Initially I had translated the steps as shown below:
RUN curl https://s3.us-east-2.amazonaws.com/urbit-on-arm/urbit-on-arm_public.gpg | apt-key add -

RUN echo 'deb http://urbit-on-arm.s3-website.us-east-2.amazonaws.com buster custom' | tee /etc/apt/sources.list.d/urbit-on-arm.list

RUN apt update \
 && apt install -y urbit
But then I came across an installation script that was used in mopfel-winrux/urbit-umbrel which did exactly what mines does but its a bit more dynamic. Dynamic in the sense that if someone were to run our Aarch64 docker image on an AMD64 device, the script will determine that and point the user to the correct binary. Resulting in our binary secretly not being strictly Aarch64 🤫. Heres the script:
#!/bin/bash
set -e
DEVICE_ARCH=$(uname -m)
if [[ $DEVICE_ARCH == "aarch64" ]]; then
  mkdir -p /urbit/binary
  cd /urbit/binary/
  wget https://github.com/botter-nidnul/urbit/releases/download/urbit-v1.8-aarch64/urbit-v1.8-aarch64-linux.tgz
  tar zxvf ./urbit-v1.8-aarch64-linux.tgz --strip=1
  mv /urbit/binary/urbit* /usr/sbin/

elif [[ $DEVICE_ARCH == "x86_64" ]]; then
  mkdir -p /urbit/binary
  cd /urbit/binary/
  wget --content-disposition https://urbit.org/install/linux64/latest
  tar zxvf ./linux64.tgz --strip=1
  mv /urbit/binary/urbit* /usr/sbin/
fiI saved this script as install-urbit.sh in the urbit-docker directory we created in the beginning.
Then I added this code to our Dockerfile, which first copies the script to the /tmp/ directory on the image, changes permission on the script, runs the scripts, then deletes the script file. Nice and clean.
COPY install-urbit.sh /tmp/install-urbit.sh
RUN  chmod +x /tmp/install-urbit.sh && /tmp/install-urbit.sh && rm /tmp/install-urbit.sh
I added an environment variable for the LANG set to c.UTF-8, created a working directory, created mount point to that directory, exposed the ports required for Urbit which are http and ames, and lastly the ENTRYPOINT is added the command to run once the image is successfully running, which in our case is the command that invokes the Urbit binary, and thats urbit.
ENV LANG C.UTF-8
WORKDIR /urbit
VOLUME /urbit
EXPOSE 80
EXPOSE 34343

ENTRYPOINT ["urbit"]
I am not entirely sure how the ENV LANG C.UTF-8 environment is useful but I know I came across an article that said it might be required for my specific use case. I may be wrong, if so, please enlighten me.
Alrighty, now lets look at that finished Dockerfile:
FROM arm64v8/python:3.9-slim-buster as ship-runner

MAINTAINER Interesting Soup <[email protected]>

RUN apt-get update && apt-get --no-install-recommends install -y curl wget gnupg

COPY install-urbit.sh /tmp/install-urbit.sh

RUN  chmod +x /tmp/install-urbit.sh && /tmp/install-urbit.sh && rm /tmp/install-urbit.sh


ENV LANG C.UTF-8
WORKDIR /urbit
VOLUME /urbit
EXPOSE 80
EXPOSE 34343

ENTRYPOINT ["urbit"]Sweet, now that we have the Dockerfile completed we can ACTUALLY move on to creating the Docker Image.
Create Docker Image
Before building the image I need to create a repo on Dockerhub. I went with interestingsoup/urbit-aarch64. Once thats done we need to back out of the urbit-docker directory and build the docker image passing the repo and path to directory containing the Dockerfile.
cd ../
docker build -t interestingsoup/urbit-aarch64 urbit-docker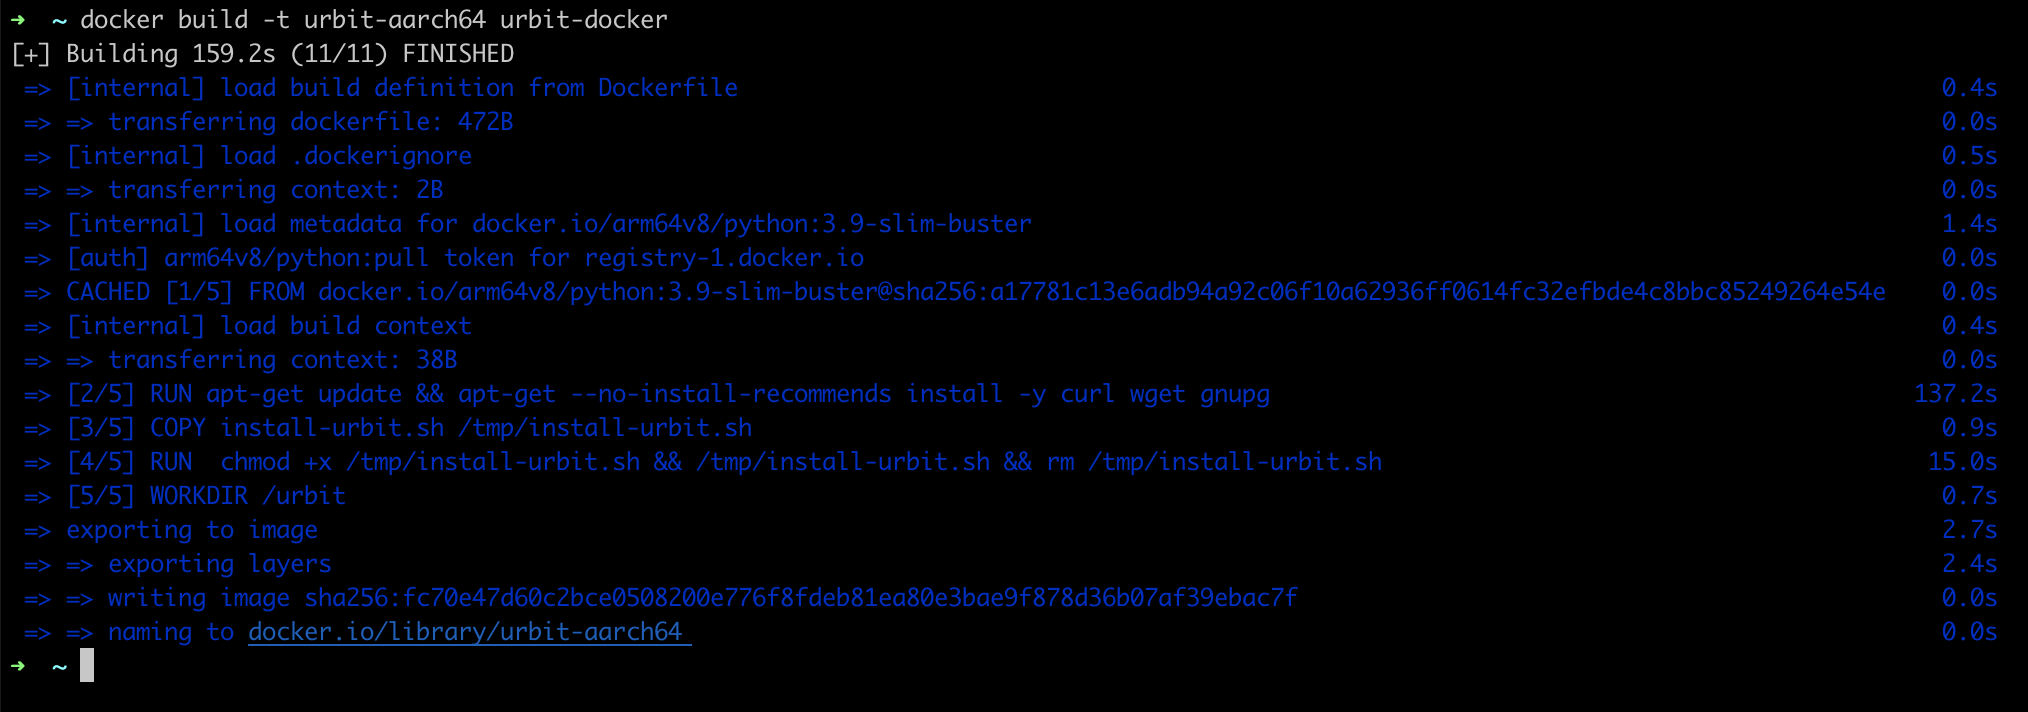
That's it, we've officially created a docker image! 🎉
Now the image can be used locally or it can be pushed to Docker Hub so you can always have access to it. If you remember, I want to run Urbit on an ARM64 K3s cluster so pushing it to Docker Hub will allow me to easily reference it when I am creating my Kuberenetes manifest file . Tutorial coming soon!
Push image to Docker Hub
To push the image to Docker Hub, we will run docker push along with our repo name that we created in the previous step.
docker push interestingsoup/urbit-aarch64
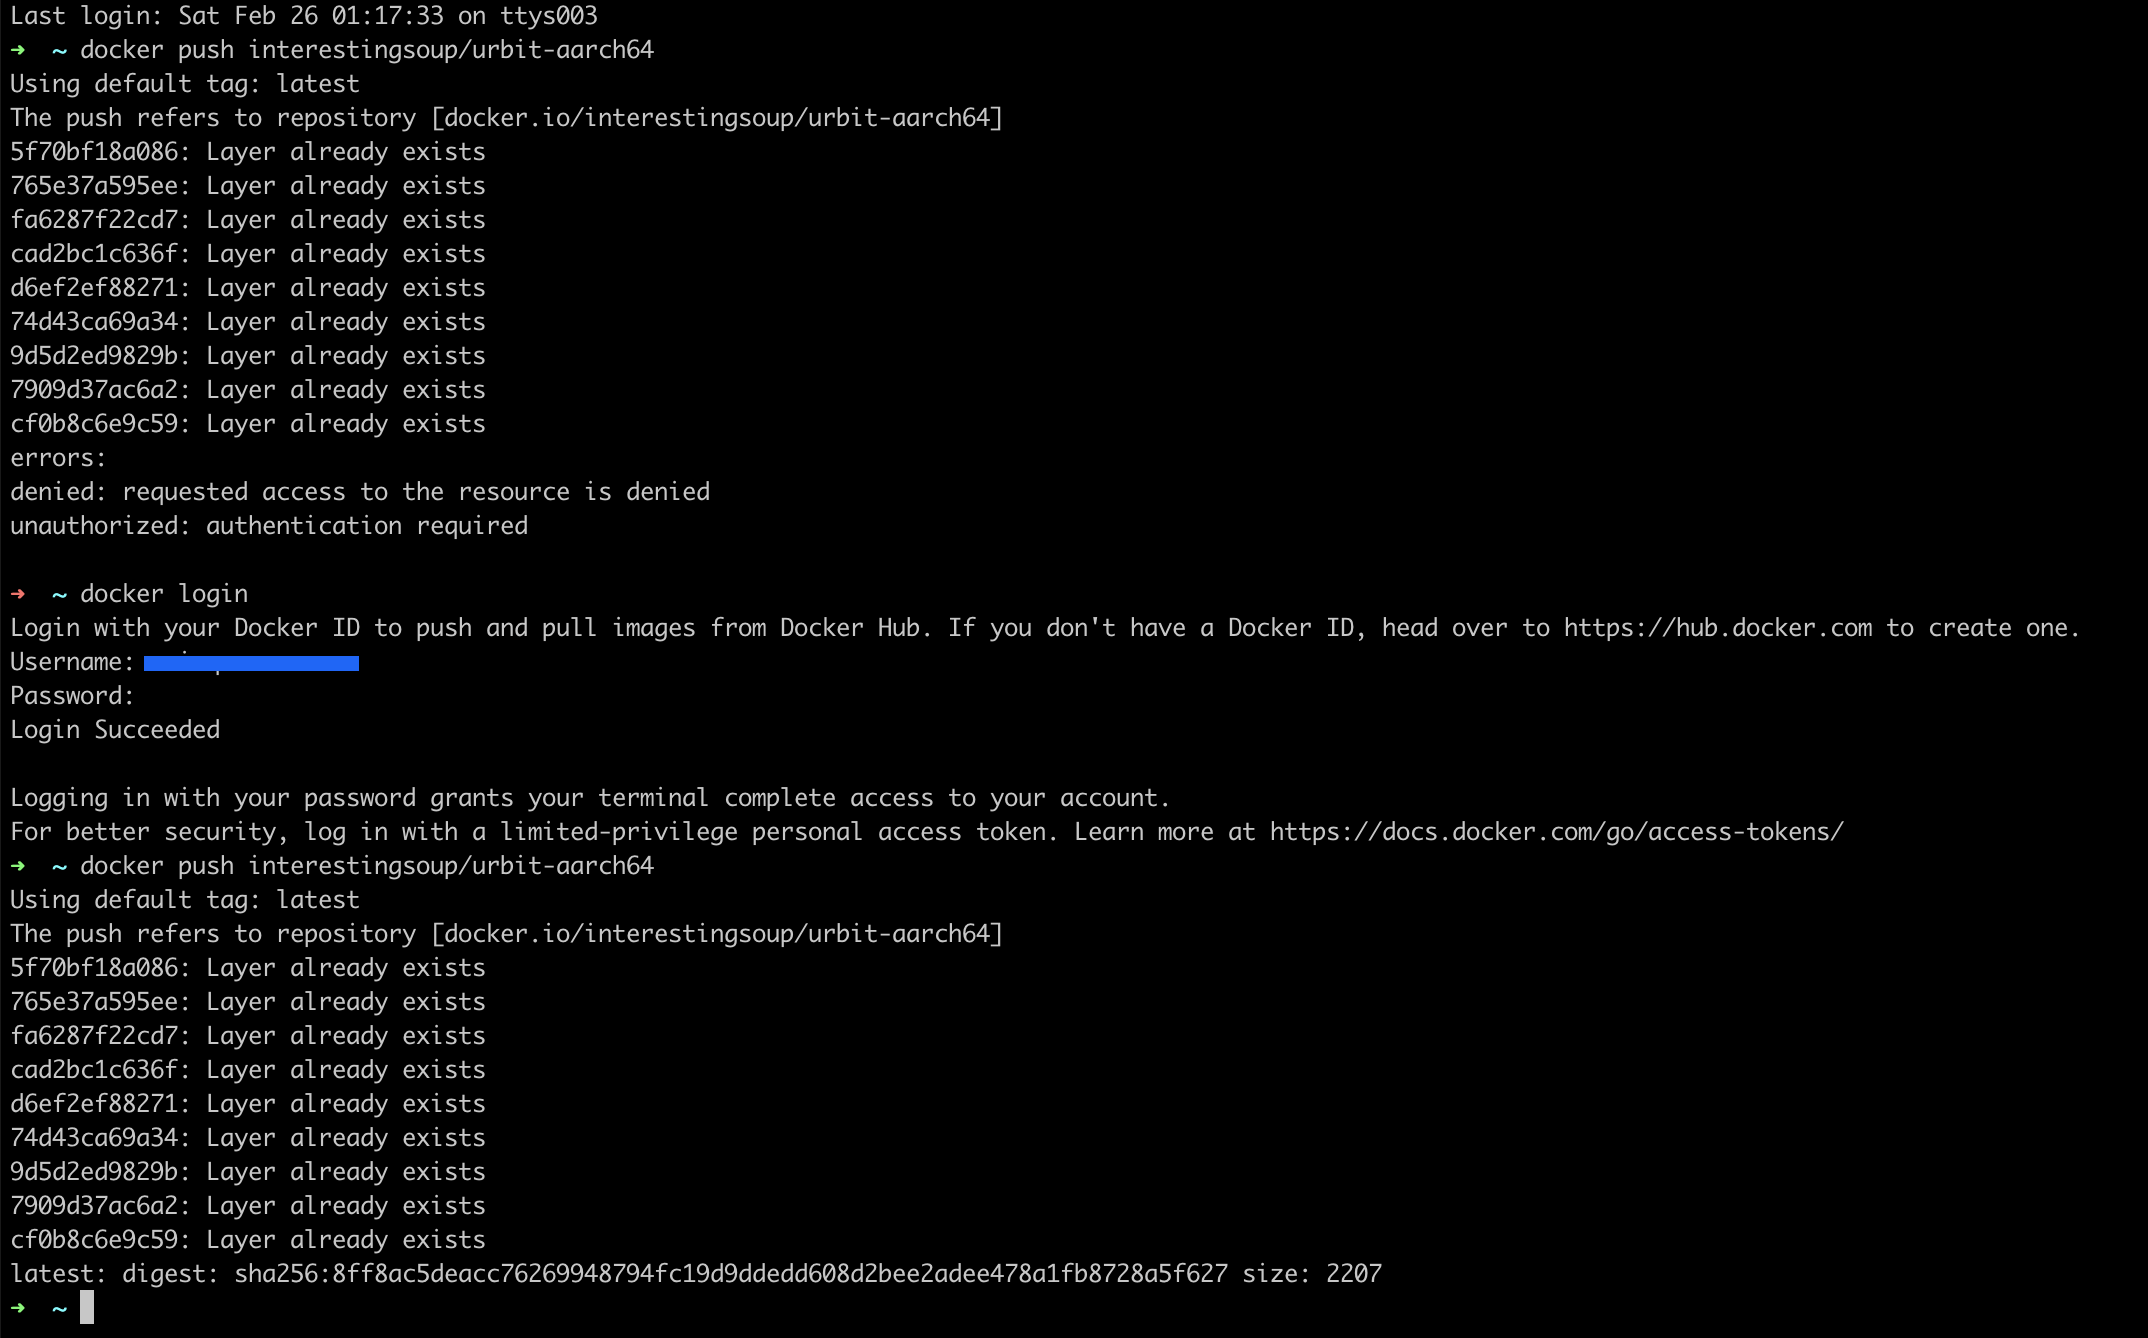
docker login before i could push. And thats how simple it was! It's pushed ✅ available here:
Thank you for giving our post a read. We hope you got a general run down on how a basic docker image is created. If you have any questions you can email us, join our Urbit group: ~togtun-pocres/brain-interestingsoup-bowl-with-spoon, or DM ~togtun-pocres on Urbit.